
How to Set Up Terraform Backend with AWS S3 and DynamoDB
- Arun Raj T.M.
- Jul 5, 2023
- 5 min read
Terraform is a popular tool for managing infrastructure as code (IaC) in the cloud. However, by default, Terraform stores the state of the infrastructure in a local file called terraform.tfstate. This file is crucial for Terraform to track the resources it creates, modifies or deletes. However, storing the state file locally has some drawbacks, such as:
It is not easily accessible by other team members who may want to collaborate on the same infrastructure.
It is not backed up or versioned, which can lead to data loss or corruption in case of accidental deletion or human error.
It is not protected from concurrent updates, which can cause conflicts or inconsistencies if multiple users run Terraform commands at the same time.
Last but not least, it is a security risk as it stores all data like keys, passwords, etc. in plain text and anyone who has access to the file has access to all the sensitive data as well.
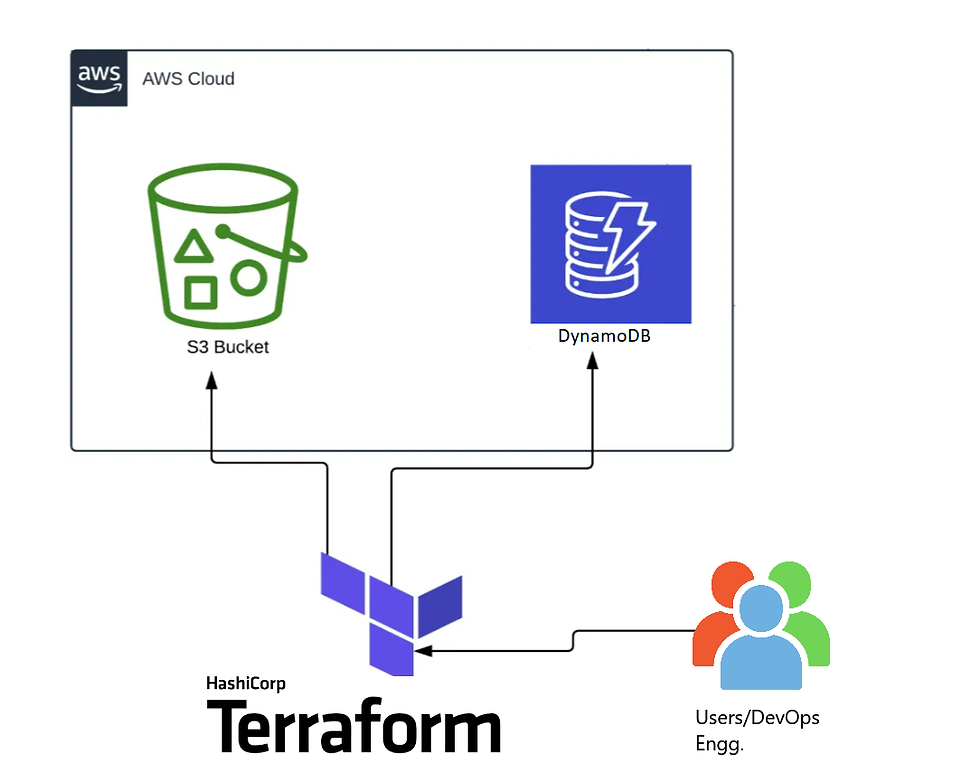
To overcome these limitations, Terraform offers the option to use a remote backend to store and manage the state file. A remote backend is a service that provides storage and locking capabilities for the state file. Terraform supports various types of remote backends, such as Terraform Cloud, Consul, etcd, etc. In this post, we will focus on how we can set up a remote backend using AWS S3 and DynamoDB and also why we need a combination of both AWS services.
Create an S3 bucket and setting it as terraform backend.
As a pre-requisite/standard practice, I am configuring AWS using aws configure from the terminal before and won’t be setting the provider from the terraform configuration.
Step – 1: Create a file called “s3backend.tf” (The .tf file can have any name) with the following code:
# s3 Bucket creation
resource "aws_s3_bucket" "backend" {
  bucket = "arun-terraform-state-backend-test"
}

# Setting s3 bucket ACL
resource "aws_s3_bucket_ownership_controls" "backend" {
  bucket = aws_s3_bucket.backend.id
  rule {
    object_ownership = "BucketOwnerPreferred"
  }
}

resource "aws_s3_bucket_acl" "backend" {
  depends_on = [aws_s3_bucket_ownership_controls.backend]
  bucket     = aws_s3_bucket.backend.id
  acl        = "private"
}

# Setting s3 bucket encryption
resource "aws_s3_bucket_server_side_encryption_configuration" "backend" {
  bucket = aws_s3_bucket.backend.id

  rule {
    apply_server_side_encryption_by_default {
      sse_algorithm = "AES256"
    }
  }
}
Step -2: Open the terminal from the working directory and run terraform init to initialize the directory.

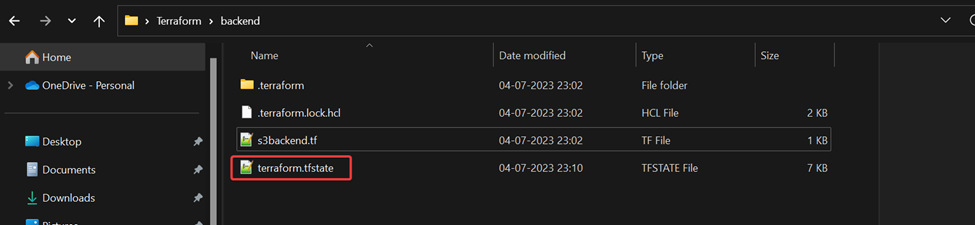
In this case my working directory is D:\Desktop\Terraform\backend
You will be able to see a terraform.lock.hcl file and a .terraform directory created in the working folder.
Step – 3: On the terminal window run terraform apply (running terraform apply -auto-approve to avoid prompts)
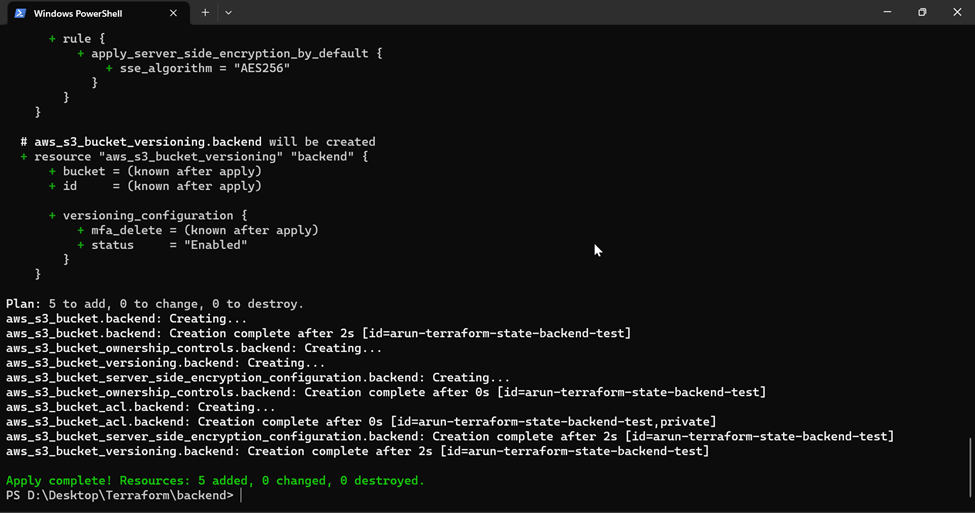
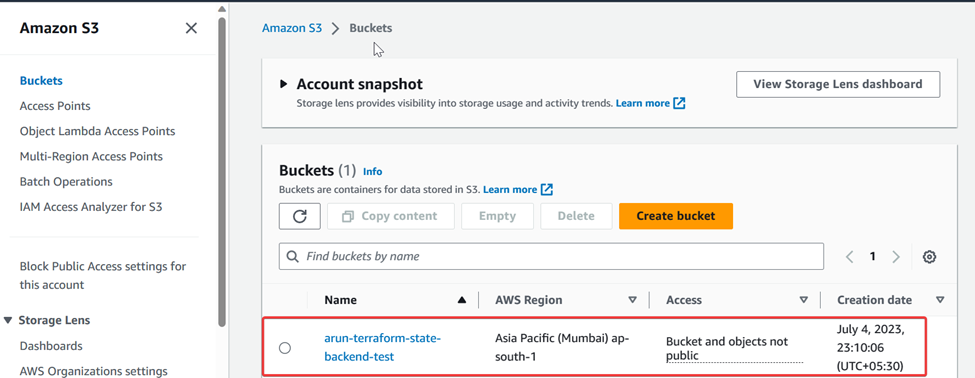
As you can see, a s3 bucket with the name arun-terraform-state-backend-test is created.
You should also see a terraform.tfstate file created in the working directory.
Step – 4: Add the following code in the terraform block to the same file to configure the AWS s3 bucket created to be the terraform backend.
# Configuring the S3 Backend
terraform {
backend "s3" {
bucket = "arun-terraform-state-backend-test"
key = "terraform.tfstate"
region = "ap-south-1"
}
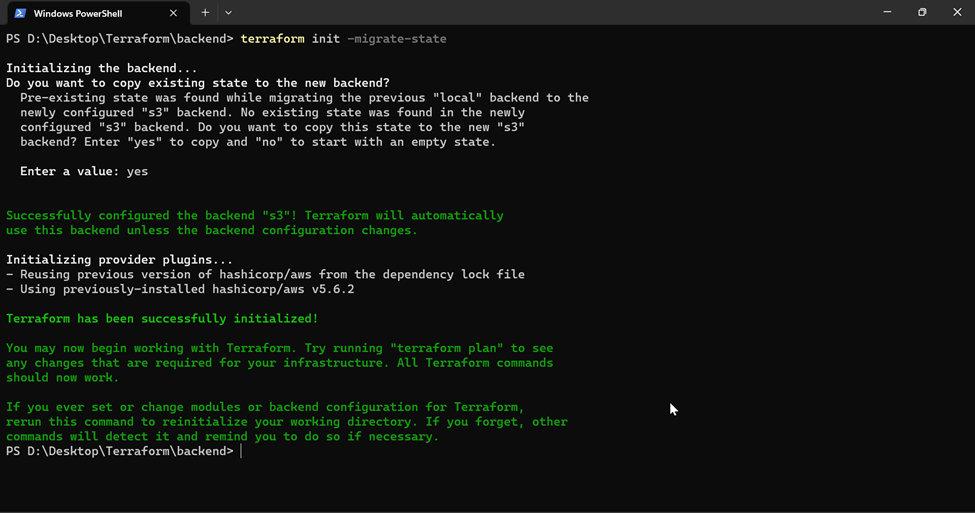
}Step -5: Open the terminal from the working directory and run terraform init -migrate-state to initialize the AWS s3 backend and migrate the state to the s3 bucket.
Understanding state-locking
Let’s take a small example for understanding state-locking as follows:
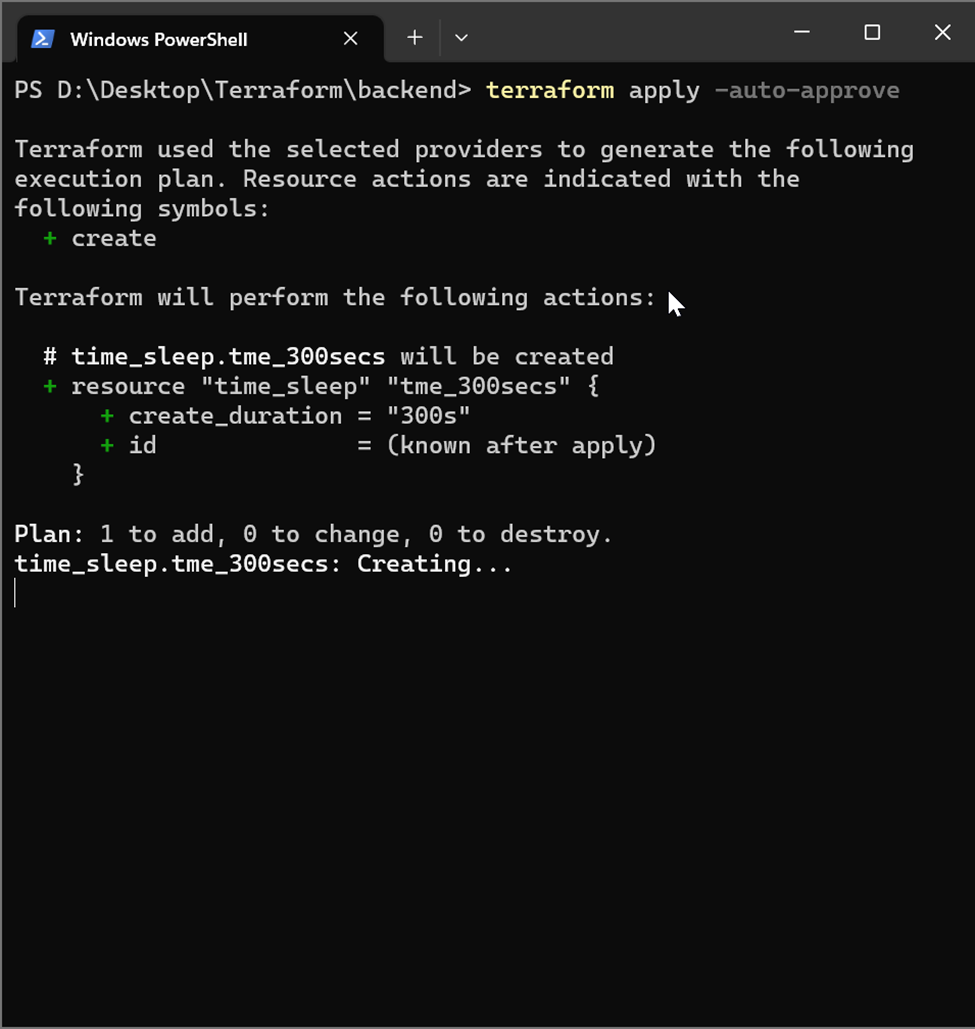
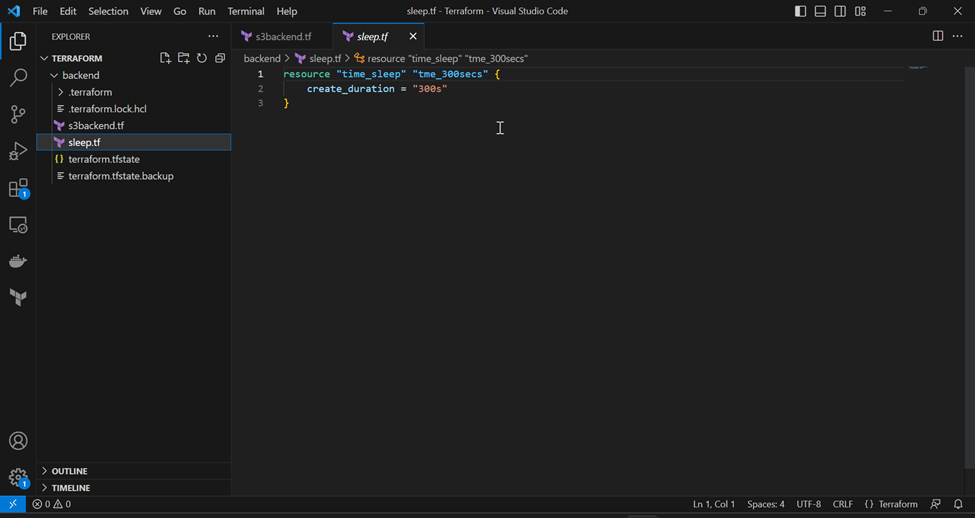
Step – 1: Creating a simple tf file with time_sleep and naming it sleep.tf
resource "time_sleep" "tme_300secs" {
    create_duration = "300s"
}
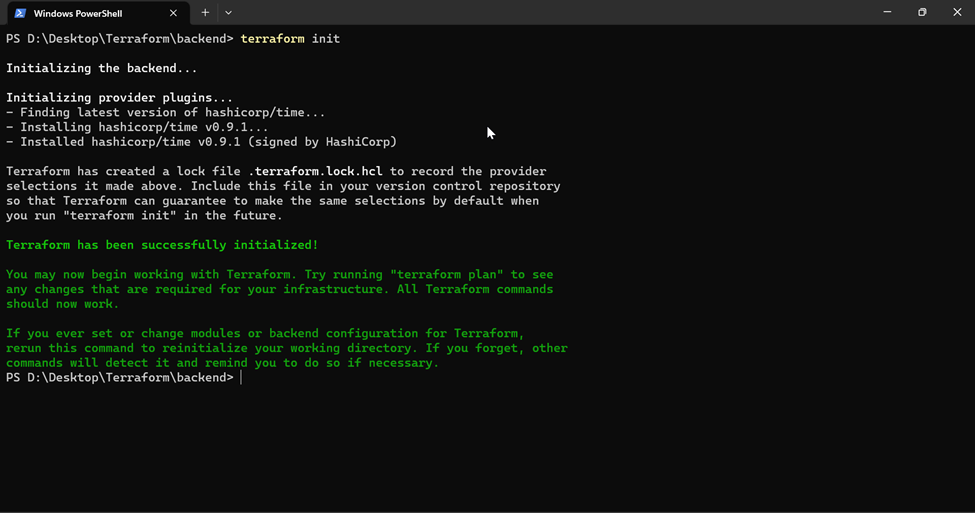
Step – 2: Open the terminal from the working directory and run Run terraform init to initialize the working directory.
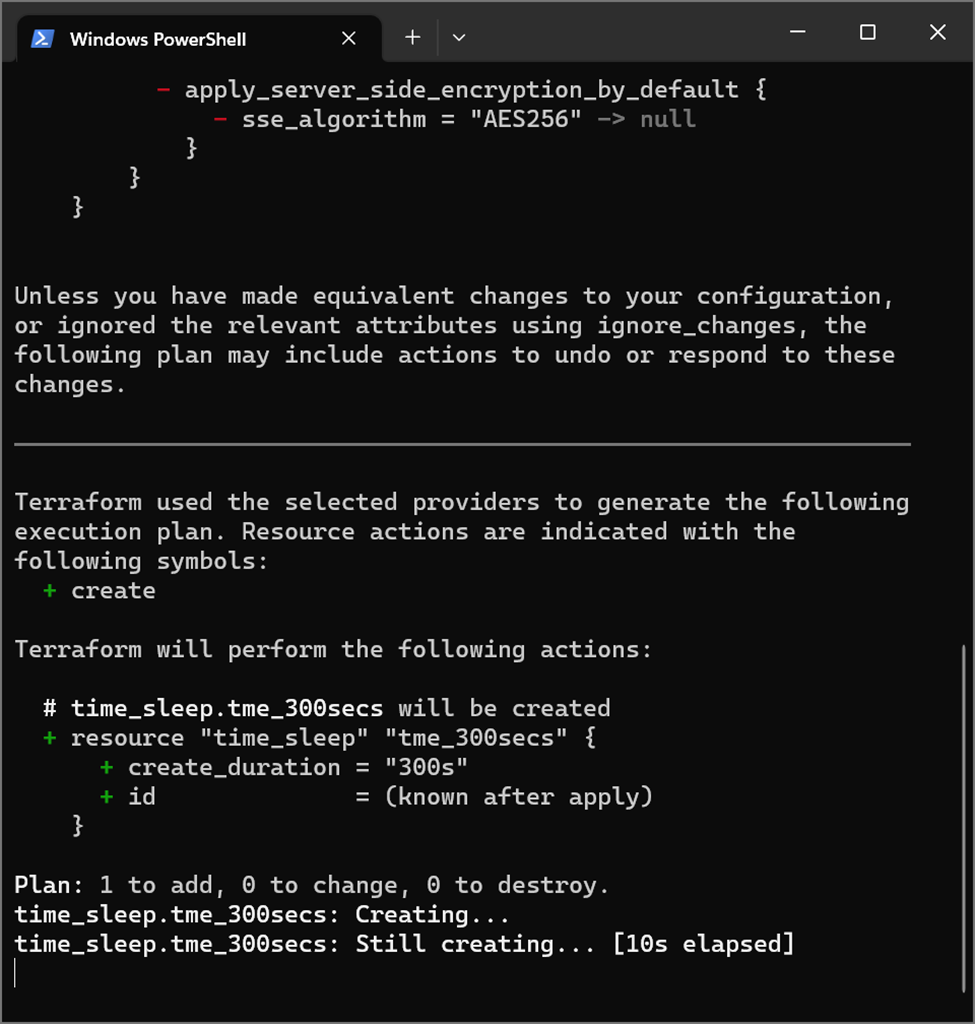
Step – 3: Run terraform apply from the working directory
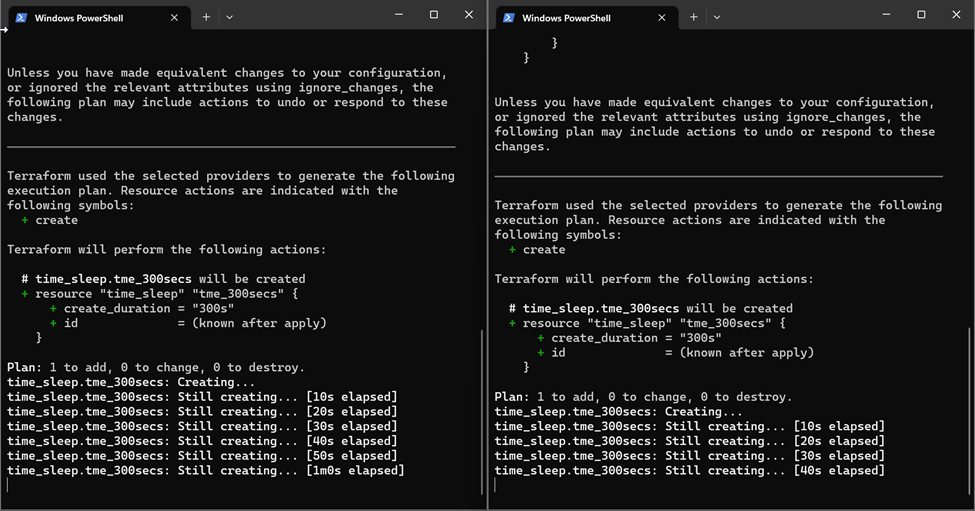
Step – 4: Simultaneously run terraform apply on another terminal from the working directory.
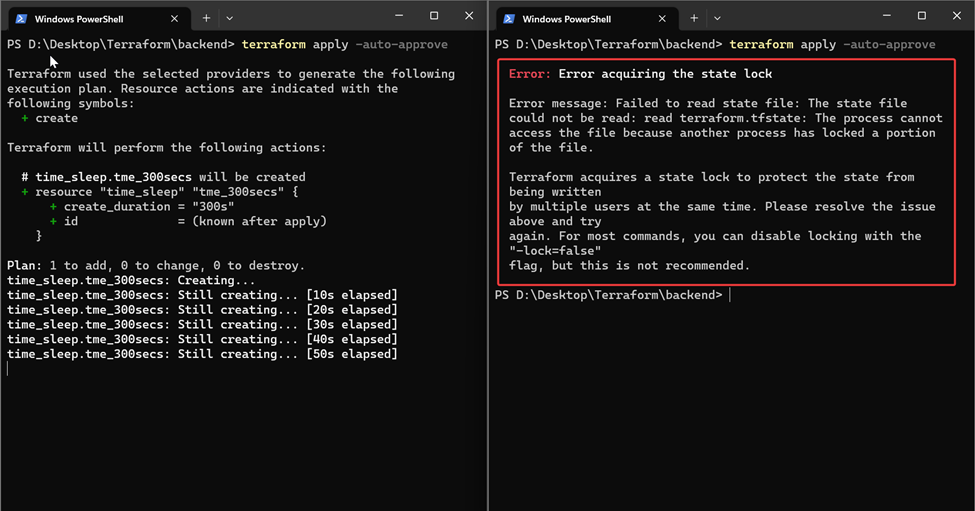
You see that the second run fails as it is unable to read the state file due to a state lock by the previous run. This is important as it mimics a scenario where 2 users are trying to run using the same state file and this could cause corruption of the state file.
In the above example, we saw state locking which is default behavior of the local backend. Lets go back to the remote backend of AWS s3 and check if the same applies there. For this we will create the same sleep.tf in the working directory as before.
Step – 1: Creating a simple tf file with time_sleep and naming it sleep.tf and run terraform init to initialize time provider.
resource "time_sleep" "tme_300secs" {
    create_duration = "300s"
}
Step – 2: Run terraform apply from the working directory
Step – 3: Simultaneously run terraform apply on another terminal from the working directory.
Notice that this time both the terraform apply commands run without errors. This is because the remote backend of AWS s3 does not support state locking by itself. It supports the state locking with a combination of DynamoDB. Let us configure DynamoDB to the backend and check again.
Why AWS S3 and DynamoDB?
AWS S3 is a scalable and durable object storage service that can store any type of data. DynamoDB is a fast and reliable NoSQL database service that can handle high concurrency and throughput. Together, they form a powerful combination for storing and locking the Terraform state file.
The benefits of using S3 and DynamoDB as a remote backend are:
The state file is stored in an encrypted S3 bucket that can be accessed from anywhere with proper credentials.
The state file is versioned by enabling bucket versioning on S3, which allows for state recovery in case of accidental deletions or human error.
The state file is locked by using a DynamoDB table that prevents concurrent updates and ensures consistency checking.
Creating DynamoDB and configuring AWS s3 remote backend with state locking
Step – 1: Edit/Create the DynamoDB table using the following:
resource "aws_dynamodb_table" "backend" {
  name         = "arun-terraform-state-lock"
  billing_mode = "PAY_PER_REQUEST"
  hash_key     = "LockID"

  attribute {
    name = "LockID"
    type = "S"
  }
}
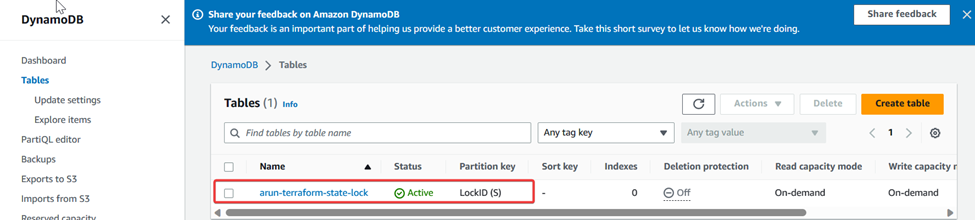
Step – 2: From a terminal window initiated from the working directory, run terraform apply.
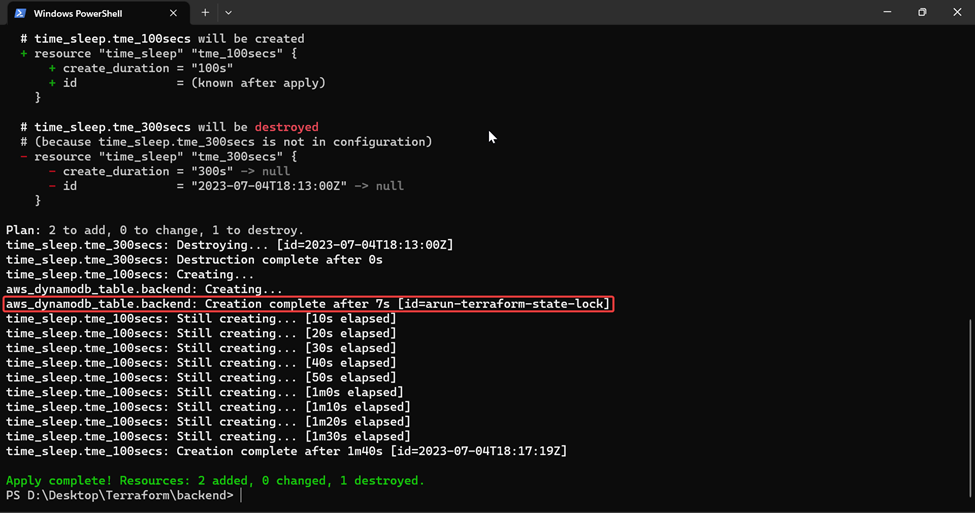
DynamoDB table called arun-terraform-state-lock with a single attribute LockID (S) as the hash key is created.
Step – 3: Configure/Edit the terraform backend settings as follows:
terraform {
  backend "s3" {
    bucket         = "arun-terraform-state-backend-test"
    key            = "terraform.tfstate"
    region         = "ap-south-1"
   dynamodb_table = "arun-terraform-state-lock"
  }
}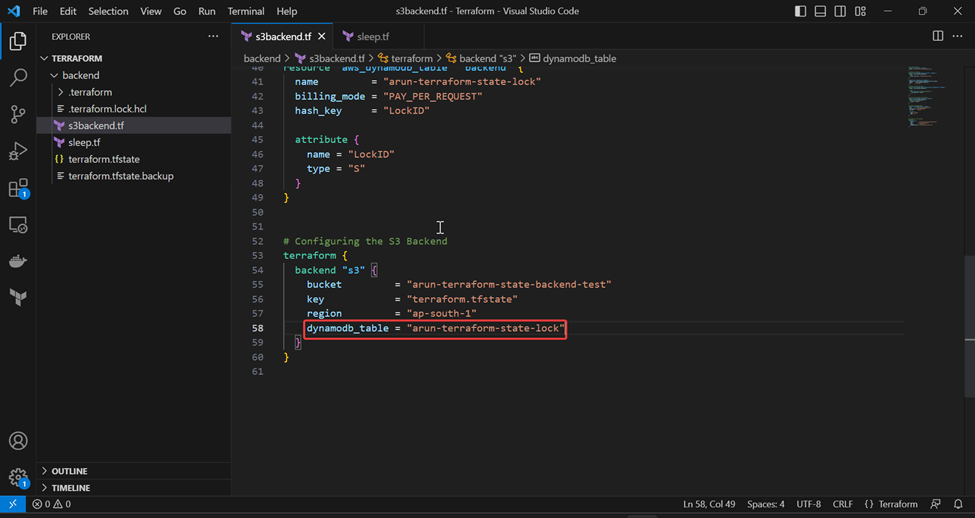
This code will instruct Terraform to use the S3 backend with the specified bucket, key and region, and to use the DynamoDB table for locking and consistency checking.
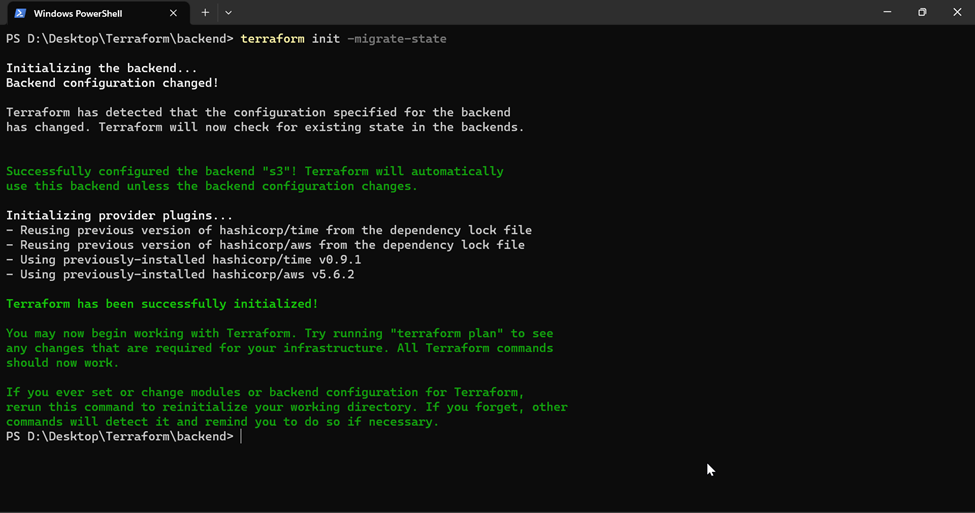
Step – 4: Run a terraform init -migrate-state for setting the terraform backend with DynamoDB state locking functionality.
Step – 5 (Optional): Testing the state lock using DynamoDB. For this we run the terraform apply simultaneously.
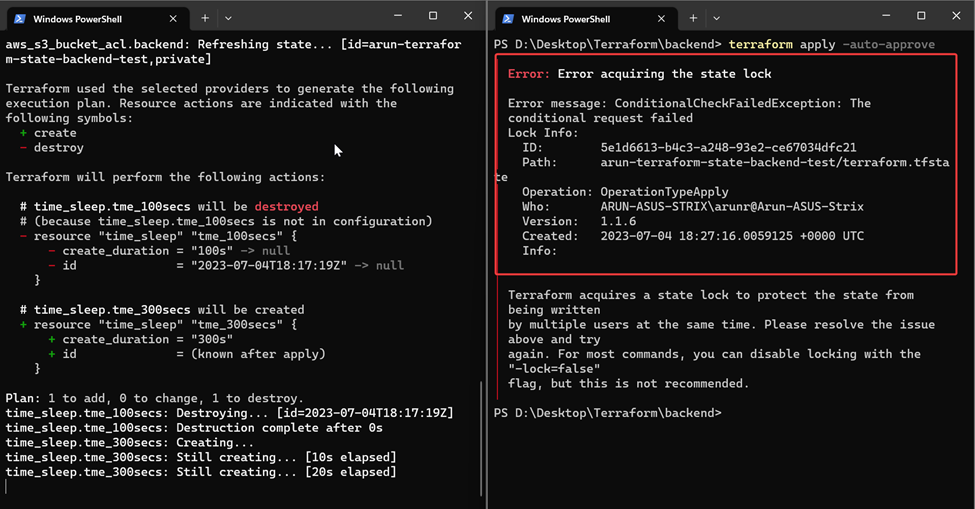
As expected, we can see that the second run has failed due to state lock. It also shows us who has the lock.
Note
We can also use partial configuration to omit some of the backend settings and provide them later when initializing the backend. For example:
terraform {
  backend "s3" {}
}
The above code will prompt us to enter the missing settings such as bucket, key, region and dynamodb_table when running terraform init.
Conclusion
In this blog post, we learned the following:
· How to set up a remote backend with AWS S3 and DynamoDB for Terraform
· What is state locking and why it is important
· AWS s3 Remote backend with lock helps us store and manage the state of our infrastructure in a secure, reliable and collaborative way.
· We also learned how to create the necessary resources for the backend using Terraform, how to configure the backend settings in our configuration file, and how to initialize the backend using terraform init.
Reference:
For more information on AWS Resources, please refer to the official documentation:
For more information on Terraform backends, please refer to the official documentation: https://www.terraform.io/docs/language/settings/backends/index.html
For more information on Terraform AWS provider, please refer to the official documentation:

Comments